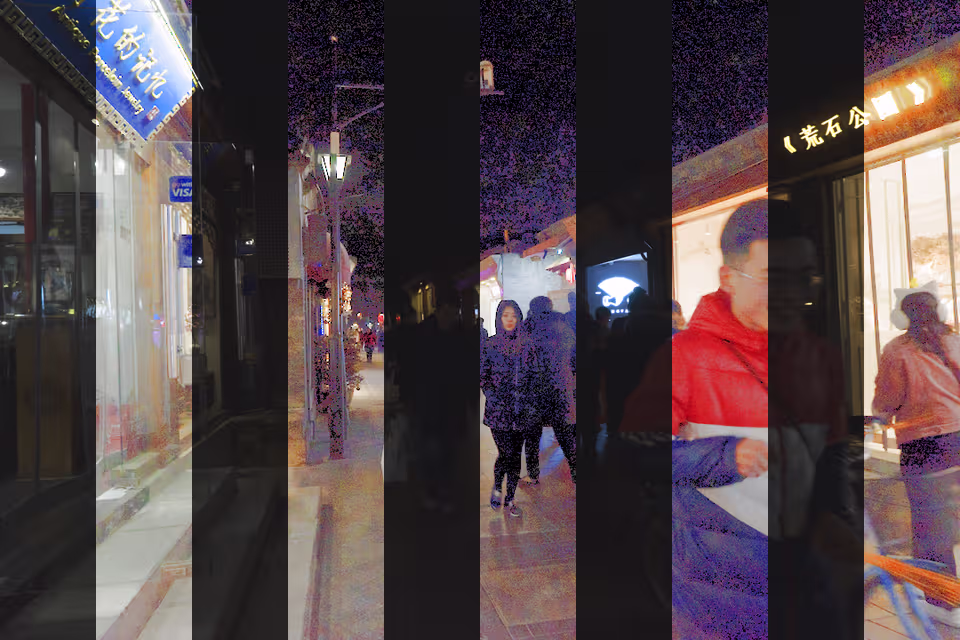
Upon utilizing the Oskam, it swiftly became evident that the images appeared excessively dark and scarcely legible under low-light conditions.
I incorporated a 12 LED Ring as a flashlight, but it proved rather inconvenient, often either too bright or insufficiently so. Furthermore, even images taken in regular daylight exhibited low contrast and appeared blurry. Initially, I attempted to address this issue by adjusting the contrast using the PILLOW library, yet this proved ineffective in cases of poor lighting.
Seeking a solution, I came across a paper by Mu et al. (2021). The outcomes seemed promising, but the algorithm proposed was only available in pseudocode.
This post concerns the implementation of the algorithm proposed in the paper using Python.
Weighted Guided Image Filtering (WGIF)
For the implementation of the Weighted Guided Image Filtering I used a Julia implementation I found as reference.
from scipy import ndimage

def edgeaware(img, radius):
    (height, width) = img.shape
    L = img.max()-img.min()
    eps = (0.001*L)**2
    mean_I = ndimage.uniform_filter(img, size=radius, mode='mirror') # calc_mean(image, radius, N)
    corr_I = ndimage.uniform_filter(img*img, size=radius, mode='mirror') # calc_mean(img .* img, r, N)
    var_I = corr_I - mean_I * mean_I
    gamma = (var_I + eps) * sum(1 / (var_I + eps)) / (height*width)
    return gamma

def wgif(img, guide, radius, llambda):
    gamma = edgeaware(img, 1)
    (height, width) = img.shape

    mean_img = ndimage.uniform_filter(img, size=radius, mode='mirror') #calc_mean(img, r, N)
    mean_guide = ndimage.uniform_filter(guide, size=radius, mode='mirror') #calc_mean(guide, r, N)
    corr_img = ndimage.uniform_filter(img*img, size=radius, mode='mirror') #calc_mean(img .*img, r, N)
    corr_Ip = ndimage.uniform_filter(img*guide, size=radius, mode='mirror') #calc_mean(img .*guide, r, N)

    var_I = corr_img - mean_img * mean_img
    cov_Ip = corr_Ip - mean_img * mean_guide

    a = cov_Ip / (var_I + llambda / gamma)
    b = mean_guide - a * mean_img

    mean_a = ndimage.uniform_filter(a, size=radius, mode='mirror') #calc_mean(a, r, N)
    mean_b = ndimage.uniform_filter(b, size=radius, mode='mirror') #calc_mean(b, r, N)

    q = mean_a * img + mean_b
    return q
Implementation of the proposed algorithm
Using the WGIF filter I implemented the pseudocode from the referenced paper:
import numpy as np

# helper for color_restoration == 'hls'
def adjust_lighting(rgb, new_lighting):
    hls = colorsys.rgb_to_hls(rgb[0]/255, rgb[1]/255, rgb[2]/255)
    rgb = colorsys.hls_to_rgb(hls[0], new_lighting, hls[2])
    return [int(rgb[0]*255), int(rgb[1]*255), int(rgb[2]*255)]

def rgb_to_greyscale(rgb):
    return 0.2126*rgb[0] + 0.7152*rgb[1] + 0.0722*rgb[2]

# https://doi.org/10.1007/s41095-021-0232-x
def illuminate(image_data, color_restoration=None):
    """Illuminates the given image

    Parameters
    ----------
    image : array
        The image that is to be illuminated, given as array with shape (width, height, 3)
        for an rgb image and (width, height) for an greyscale image. The image data should
        be in the range of [0, 255].
    color_restoration : None | 'linear'| 'hls', optional
        Whether the color should be restored after illumination and what method to use,
        only applicable for rgb input images
    Returns
    -------
    array
        The illuminated image values. The output depends on the type of image (rgb or
        greyscale) and color_restoration.
    """
    if color_restoration not in [None, 'linear', 'hls']:
        raise Exception("The provided color restoration method not supported, supported
        color restoration methods: [None, 'linear', 'hls']")

    image_data = image_data.astype(np.uint8)
    is_greyscale = len(image_data.shape) == 2
    height, width = image_data.shape[0:2]

# 1) Load original RGB color image S(x, y), convert to HSI color model, select intensity image SI (x, y).
    S_I = image_data if is_greyscale\
        else np.apply_along_axis(rgb_to_greyscale, 2, image_data)\
            .reshape(height, width)\
            .astype(np.uint8)

# 2) Enhance intensity image
    # Compute and process illumination component
    # 1. Use WGIF to estimate illumination component of intensity: SILi(x, y) = aiSIi(x, y) + bi
    S_IL_PRE = wgif(S_I, S_I, 3, 0.001)
    S_IL_PRE = np.clip(S_IL_PRE,0.1,255)
    S_IL = S_IL_PRE / 255
    #  Adaptive brightness equalization
    #   2. Correct the illumination component using adaptive gamma function: SILG(x, y) = SIL(x, y))f(x,y)
    a = 1 - (np.mean(S_IL))
    gamma = (S_IL + a)/(1+a)
    S_ILG = np.abs(S_IL) ** gamma

    #   3. Perform global linear stretching: SILGf (x, y) = SILG(x,y)-min(SILG(x,y)) / max(SILG(x,y))-min(SILG(x,y))
    S_ILGf = (S_ILG - np.min(S_ILG)) / (np.max(S_ILG) - np.min(S_ILG))
    # Compute and process reflection component image
    #   4. Compute the reflection component: SIR(x, y) = SI (x, y)/SIL(x, y)
    S_IR = S_I / S_IL_PRE
    #   5. Denoise the reflection component using WGIF: SIRHi(x, y) = aiSIR(x, y) + bi
    S_IRH = wgif(S_IR*255, S_IR*255, 3, 0.001) / 255


# 3) Image fusion
    # Fuse the processed illumination component and reflection component
    # 1. Compute the enhanced intensity image: SIE(x, y) = SILGf (x, y)SIRH(x, y)
    S_IE = S_ILGf * S_IRH
    # 2.Improve the brightness of the fused image using the S-hyperbolic tangent function:
    b = np.mean(S_IE)
    S_IEf = 1 / (1 + np.exp(-8* (S_IE-b)))
    if is_greyscale or color_restoration is None:
        return (S_IEf * 255).astype(np.uint8)

# 4) Color restoration
    # 1. Calculate the brightness gain coefficient: a(x, y) = S_IEf (x, y)/S_I (x, y)
    alpha = 255 * S_IEf / S_I # *255 since S_IEf is in range [0,1]

    # 2. Convert the enhanced HSI image to RGB by linear color restoration RGB(x, y) = a(x, y)RGB(x, y)
    new_image_data = np.copy(image_data)
    if color_restoration == 'linear':
        for i in range(height): # for every pixel:
            for j in range(width):
                if not isinf(alpha[i][j]):
                    new_image_data[i][j] = tuple(map(lambda x: int(np.clip(x* alpha[i,j], 0, 255)), new_image_data[i][j]))
    elif color_restoration == 'hls':
        for i in range(height): # for every pixel:
            for j in range(width):
                if not isinf(alpha[i][j]):
                    new_image_data[i][j] = tuple(map(
                         lambda x: int(np.clip(x, 0, 255)), adjust_lighting(new_image_data[i][j], S_IEf[i][j])
                    ))
    return new_image_data
Results
In search of methods to showcase the outcomes of implementing this solution implemented in python, I discovered several datasets containing low-light images:
- ExDark (Exclusively Dark Image Dataset)
- NOD (Night Object Detection)
- DARK FACE: Face Detection in Low Light Condition
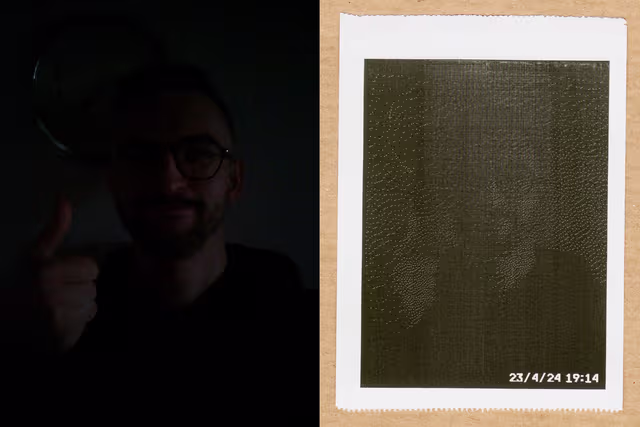
I ultimately opted for the DARK FACE dataset. Below, you’ll find some results depicting image illumination. The first row displays the original image, the second row exhibits the illuminated grayscale image, the third row uses linear scaling for color restoration and the final row showcases the color restoration achieved using HSL manipulation.
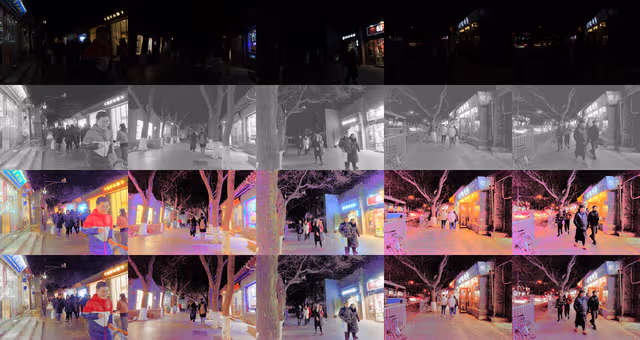
As evident from the results, the solution proposed by Mu, Q., Wang, X., Wei, Y. et al. yields remarkable outcomes.
The proposed color restoration using linear scaling unfortunately has the side effect of also increasing the saturation when increasing the lightness, leading to oversaturation. To tackle this I also implemented color restoration by converting the RGB values to HSL and replacing the lightness, before converting back to RGB. Restoring the color unfortunately is computational expensive and takes quite long. It’s noteworthy that while this solution delivers excellent results for low-light images, from my experience its performance is not as impressive for images with only certain areas affected by low light.
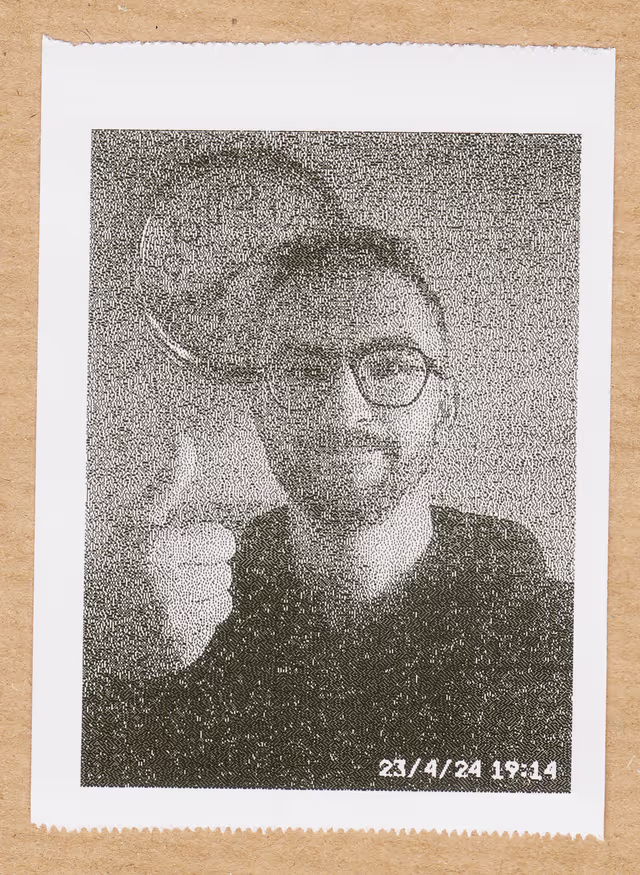
For the images intended for printing, I performed edge enhancement prior to applying the (grayscale) illumination. With this method, I achieved significantly higher quality prints of the images, especially in low light conditions.

Python Package
If you want to test or utilize this algorithm with Python, I have made it available as a Python package that you can install using:
pip install illumination_using_wgif
You can then use it as follows:
from PIL import Image
from illumination_using_wgif import illuminate

# load_image
image = Image.open("./<YOUR_IMAGE_HERE>")

rgb_image_data = np.reshape(image.getdata(), (image.size[1], image.size[0], 3))
greyscale_image_data = np.reshape(image.convert('L').getdata(),
    (image.size[1], image.size[0]))

# greyscale
illuminated_greyscale_data = illuminate(rgb_image_data)
# or: illuminated_greyscale_data = illuminate(greyscale_image_data)
illuminated_greyscale = Image.fromarray(illuminated_greyscale_data)

# linear color restoration
illuminated_linear_data = illuminate(rgb_image_data, 'linear')
illuminated_linear = Image.fromarray(illuminated_linear_data)

# hls color restoration
illuminated_hls_data = illuminate(rgb_image_data, 'hls')
illuminated_hls = Image.fromarray(illuminated_hls_data)
To use it via command line, you can paste the following content into a file called illuminate.py:
import sys
from PIL import Image, ImageFilter, ImageOps
import os
import numpy as np
from illumination_using_wgif import illuminate

def illuminate_and_save(image_path):
    # Load the image
    image = Image.open(image_path)
    image = image.filter(ImageFilter.EDGE_ENHANCE)

    greyscale_image_data = np.reshape(image.convert('L').getdata(),(image.size[1], image.size[0]))
    illuminated_greyscale_data = illuminate(greyscale_image_data)
    illuminated_greyscale = Image.fromarray(illuminated_greyscale_data)

    # Build the new image path with the "_greyscale" suffix
    file_name, file_ext = os.path.splitext(image_path)
    new_image_path = f"{file_name}_illuminated{file_ext}"

    # Save the greyscale image
    illuminated_greyscale.save(new_image_path)
    print(f"Illuminated image saved at {new_image_path}")

if __name__ == "__main__":
    if len(sys.argv) != 2:
        print("Usage: python illuminate.py <image_path>")
        sys.exit(1)

    image_path = sys.argv[1]
    illuminate_and_save(image_path)
then open a terminal in the same path and call it via
python illuminate.py <image_path>
The illuminated image will then be saved in the same location as the original image with the postfix _illuminated
If you have issues or feedback, please let me know via the Github-Repo :)